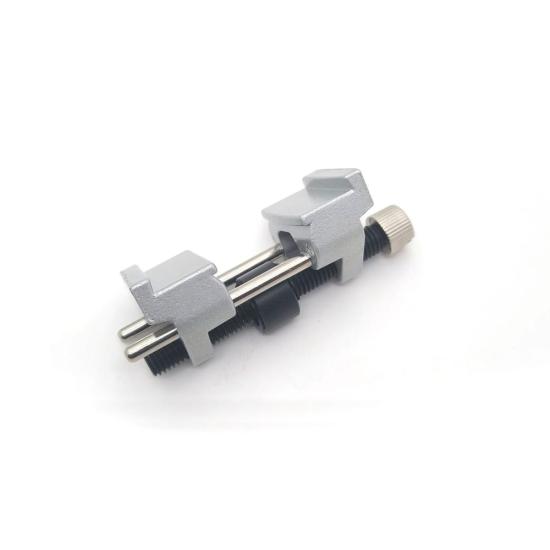
Taytools Self-Centering Side Clamping Sharpening Honing Guide Jig for Chisels and Blades

SKU of product changed toAMJ-817F in carousel content
 $15.99 USD
Now: $15.99 USD
 Logo
A lot of woodworkers sharpen freehand, but many have found that they can get a much better angle on straight edge tools if they use some type of guide. This side clamping honing guide is the most eff...More Details
Zoom
Flag Icon
Estimated
$0.00 CAD
Question Mark Icon
$15.99 USD/ea OK IconThis product is available for immediate shipment.
Flag Icon
Estimated Total
Includes Duties
Help
10+ available

A lot of woodworkers sharpen freehand, but many have found that they can get a much better angle on straight edge tools if they use some type of guide. This side clamping honing guide is the most effective and cost-effective jig on the market for putting consistent bevels on chisels and plane blades. It is patterned after the 20th century Eclipse honing guide that is no longer in production.

It consists of 2 jaws that clamp a chisel or blade from both sides by turning and tightening the screw. It can clamp blades from 1/16” wide up to 2-5/8”. There is a set of beveled notches on the lower jaws which accept bevel edge chisels up to 1-1/8’ wide. The upper platform is for wider plane blades up to 2-5/8”. The inside edge of one set of jaws is straight, and one is curved. The curved edge is designed to clamp the chisel or blade in the center pressing the tool against the opposite straight, square jaw.

You set your desired angle by extending the tool difference distances from the body of the jig, the farther a tool projects the lower the sharpening angle and the shorter the higher the angle. The two most used angles and projections are cast in the body of the jig. For the lower jaw, set your projection to 30mm or 1.18 inches for 30 degrees bevel and 40 mm or 1.57 inches for 25 degrees, and for the upper jaw, set to 38 mm or 1.5 inches for 30 degrees and 50 mm or 1.56 inches for 25 degrees. Trying to set all these angles using a ruler can be frustrating and dangerous, you can make an angle set up block for all the common angles in one place and this will make setting angles much easier and more consistent. Once the desired angle is set, tighten the screw with a screwdriver to prevent any movement. Once a chisel is locked in the jaws, you’re ready to sharpen.

The narrow roller on the bottom is wide enough to keep a blade flat on a stone but allow you to camber an iron if desired. Place the jig with your tool on your stone, apply finger pressure at the full edge of the tool to keep it straight or alternate pressure at each corner to create a slight camper or curve.
    ⚠️WARNING: Cancer and Reproductive Harm - www.P65Warnings.ca.gov

    Reviews

    3.0 out of 5.0 3.0 stars(1)
    From:
    3/5
    Good for planes and large irons, not for small chisels
    The guide has one position for plane irons and another one for chisels. The plane position works well. The clamping surface for chisels doesn't match the shape of the chisel well. For large enough chisels that's not a problem but I found it impossible to mount a 10mm chisel properly. Upon tightening the chisel rotates and is not flat when it touches the sharpening surface. I had to sharpen this chisel by hand. For the price, the guide is OK I suppose.
     
     
    Loading Icon
    Reset
    Close